After tinkering with Adobe Photoshop for a brief period, you might come to appreciate its inherent enchantment. It becomes evident that there is no solitary approach to accomplishing tasks within this software. Consequently, the question arises: How can you alter the dimensions of an image using Photoshop?
From this juncture, you have the opportunity to discover the most optimal techniques that yield the finest outcomes for your specific needs. In other words, the strategies and tools at your disposal are contingent upon your desired objectives, thus necessitating a comprehensive exploration.
With this perspective in mind, we shall now delve into diverse alternatives, accompanied by straightforward instructions on the art of resizing images within Photoshop. There exist four expeditious methods at your disposal to achieve this task.
How to Resize an Image Without Stretching it in Photoshop
Sometimes, you come across a situation where you need to resize an image, but you don’t want to compromise the integrity of your subject. Imagine having a beautiful photograph featuring a woman and her adorable cat, and you want to make it fit a specific space without distorting the primary subjects. Fear not, for there’s a nifty Photoshop technique called “Content Aware Scale” that can come to your rescue.
The Content Aware Scale: Preserving Image Integrity
The Content Aware Scale tool is like your digital magic wand that enables you to resize images without causing unsightly distortions to the main elements of your composition. This technique works particularly well when you have a subject you want to keep intact while adjusting the background. Below, we’ll walk you through the steps to achieve this seamlessly.
Step 1: Select the Area to Preserve
- Layer Selection: Start by opening your image in Photoshop and selecting the layer you wish to resize from the Layers Panel. Ensure that the layer is unlocked to make adjustments;
- Access Properties Panel: Navigate to the Properties Panel by clicking on “Windows” in the top menu bar and selecting “Properties” from the dropdown menu (Windows > Properties);
- Quick Actions: Once in the Properties Panel, scroll down to the “Quick Actions” section, and click on it to reveal a set of options;
- Select Subject: Click the “Select Subject” button. Voila! You’ll witness the emergence of marching ants outlining the subject of your image, which, in this case, is the woman and her cat;
- Pro Tip: The precision of your selection largely depends on the image quality. Higher quality images yield more precise selections;
- Save Your Selection: Head to the top menu bar, click on “Select,” and then scroll down to select “Save Selection” (Select > Save Selection);
- Naming Your Selection: A dialogue box named “Save Selection” pops up. Give your selection a fitting name; for instance, “Woman and Cat.”
Step 2: Effortlessly Reshape Images with Content-Aware Scale in Photoshop
Resizing images in Photoshop is an essential skill for photographers, designers, and digital artists alike. However, maintaining the integrity of your subject while adjusting the size of your composition can be challenging. In this comprehensive guide, we will delve into the intricacies of the Content-Aware Scale tool, a powerful feature in Photoshop that allows you to resize images without distorting or stretching your primary subject. Follow these steps to make your images visually appealing and well-proportioned.
- Access Content-Aware Scale
- Open your image in Adobe Photoshop;
- Navigate to the top menu bar and click on “Edit.”;
- Scroll down to find “Content-Aware Scale” or use the convenient keyboard shortcut: Shift + Command + Option + C (Mac) or Shift + Ctrl + Alt + C (Windows).
- Select the Protective Options
- After selecting “Content-Aware Scale,” the options bar below the top menu bar will provide you with the tools needed to protect your subject. This is crucial to ensure that the main elements of your image remain unaffected while you resize the canvas. Here’s how to do it:
- Locate the “Protect” dropdown menu in the options bar;
- Click on the dropdown menu, revealing a list of options. Select “Woman and Cat.”;
- Pro Tip: If your image contains people or skin tones that you want to safeguard during resizing, choose the icon representing the human figure in the Protect dropdown menu. This will ensure that skin tones are preserved.
- After selecting “Content-Aware Scale,” the options bar below the top menu bar will provide you with the tools needed to protect your subject. This is crucial to ensure that the main elements of your image remain unaffected while you resize the canvas. Here’s how to do it:
- Resize without Distortion
- Now, you’re ready to resize your image without causing distortion or stretching to your primary subject. Follow these steps:
- Hold down the Shift key on your keyboard;
- Locate the middle right handle of the bounding box that appears around your image;
- While holding down the Shift key, click and drag the middle right handle all the way to the edge of the canvas.
- Now, you’re ready to resize your image without causing distortion or stretching to your primary subject. Follow these steps:
As you execute this step, observe how the background of your image may get distorted and stretched while your subject remains relatively unchanged. This technique allows you to maintain the integrity of your subject while making adjustments to the overall image size.
Resizing Images with Precision: A Step-by-Step Guide
Resizing images isn’t always a one-size-fits-all task. There are times when you need to resize an image with pinpoint accuracy, down to the exact pixel dimensions. This can be essential for ensuring your visuals meet specific requirements, whether it’s for web design, printing, or any other creative project. In this comprehensive guide, we’ll walk you through the process of resizing an image to an exact size using Adobe Photoshop.
Step 1: Access the Image Size Dialogue Box
To begin, open your image in Photoshop. Follow these simple steps:
- Go to the top menu bar at the top of the screen and click on “Image.”;
- Scroll down the dropdown menu and select “Image Size,” or you can use the keyboard shortcut by simultaneously pressing Option, Command, and the letter I key (Option + Command + I);
- This will trigger the appearance of the “Image Size” dialogue box, where the magic happens.
Step 2: Choose Your Desired Dimensions
Within the “Image Size” dialogue box, you’ll find a variety of options to customize your image dimensions precisely. Here’s what you need to do:
- Locate the “Dimensions” section, and click on the button with a downward-pointing arrow. This is where you specify your image’s exact dimensions;
- There are seven unit options to choose from: Percent, Pixels, Inches, Centimeters, Millimeters, Points, and Picas. Each unit offers flexibility depending on your project’s requirements;
- Percent: Use this option if you want to scale your image by a certain percentage;
- Pixels: Ideal for precise pixel-based adjustments;
- Inches, Centimeters, Millimeters: Suitable for print projects with specific size requirements;
- Points: Often used for graphics and typography adjustments;
- Picas: A specialized unit for certain design contexts;
- Ensure the “Resample” option is checked. If not, follow these steps:
- Locate the “Resample” checkbox, and make sure there’s a checkmark next to it;
- Keep the default resampling option as “Automatic.”
Now, with “Resample” activated, you can click on the arrow next to the “Dimensions” field and select your desired unit of measurement. In this example, we’ve chosen “Pixels” for precise pixel-based resizing. You have the flexibility to choose the unit that best suits your project’s requirements.
Adjusting Image Size with Precision
In this step, we will delve into the intricacies of resizing your image to meet your exact specifications. Whether you’re preparing it for a website, social media, or any other digital platform, precision matters. Here’s how you can do it effectively:
- Width and Height Fields: Upon reaching this stage, you’ll notice the Width and Height fields awaiting your input. These fields determine the final size of your image in pixels. Take the following actions;
- Specify Pixel Dimensions: Enter the exact number of pixels you desire for the width and height of your image. This is where you have full control over the size. Consider the standard dimensions for various platforms to ensure optimal display quality. For instance, common web sizes for images are 1920×1080 pixels for full HD and 1080×1080 pixels for square images on social media;
- Unit Selection: If you prefer using units other than pixels, you have the flexibility to do so. Simply click on the units dropdown to explore other options like inches, centimeters, or percentages. Select the unit that aligns with your project requirements;
- Maintain Aspect Ratio: An essential aspect of resizing images is preserving their aspect ratio, ensuring that they don’t appear distorted. To do this;
- Constrain Proportions: Make sure the chain link icon (often symbolizing the constraint of proportions) is selected. This ensures that when you alter the width or height, the other dimension adjusts proportionally. It guarantees that your image maintains its original shape and doesn’t become stretched or squished;
- Aspect Ratio Importance: Understand the significance of aspect ratio in your project. For example, a standard aspect ratio for photos is 3:2, while widescreen displays often use 16:9. Keeping this in mind can help you create visually pleasing content;
- Resolution for Web: If your image is intended solely for digital display and won’t be printed, consider the resolution. For web purposes, 72 pixels per inch (PPI) or DPI (dots per inch) is the minimum resolution needed for sharp and clear on-screen viewing. Higher resolutions are unnecessary and may increase file size without improving image quality;
- DPI Awareness: Be aware that higher DPI values are more suitable for print materials, not digital platforms. Keep your image efficient for web usage by sticking to 72 DPI;
- Applying Changes: After deciding on your image specifications, edit either the width or height to match your desired size. Once you’ve made the adjustments, hit the “OK” button or simply press the “Return” or “Enter” key on your keyboard;
- Preview Your Work: Instantly, you’ll witness your image transformed into its new dimensions, perfectly tailored to your needs. Take this opportunity to review the image and ensure it meets your expectations.
Resizing Images Without Distortion: A Creative Approach
Sometimes, you find yourself in a situation where you need to adjust the size of an image to fit a specific canvas, but you don’t want to distort or stretch any part of the artwork or photo. Whether you’re a professional designer or an enthusiastic hobbyist, this challenge is something you may encounter frequently. In this guide, we’ll explore how to resize an image without compromising its integrity and aesthetics. We’ll delve into various methods, including a special feature in Photoshop, to help you achieve this seamlessly.
The Dilemma of Canvas Size Adjustment
Imagine you have a beautiful image, and you want to change the canvas size to make it wider or taller. However, doing so may leave you with empty spaces that you wish to fill creatively. Here’s a common scenario:
- You’ve widened the canvas, and there’s empty space on the sides;
- You don’t want to fill it with a plain, solid color; that would be bland;
- Cloning parts of the image onto the empty space pixel by pixel is tedious and time-consuming;
- Proportionately expanding the image would fill the space, but it may crop off parts of the artwork – not ideal;
- Stretching the image sideways by holding the shift key and dragging the side handle may make it fit, but it distorts the contents, which is far from desirable.
Resolving the Dilemma: Photoshop’s Solution
Enter Photoshop, a versatile tool that can rescue your image resizing woes without distorting your precious artwork or photos. Here’s how:
Content-Aware Scale: Photoshop’s Content-Aware Scale feature is a game-changer. It allows you to resize your image intelligently, preserving important details and avoiding distortion. Here’s how to use it:
- Open your image in Photoshop;
- Select the “Image” menu, then choose “Canvas Size” to adjust your canvas dimensions;
- Now, select the “Edit” menu and choose “Content-Aware Scale.”;
- Grab the handles of the image and adjust the size as needed. Photoshop will intelligently determine which areas can be stretched or compressed without compromising the content.
Duplicate Layers: Another method to resize your image creatively is by duplicating layers. This technique is particularly useful when you want to maintain the quality and composition of your image. Here’s how:
- Duplicate your image layer by right-clicking on it and selecting “Duplicate Layer.”;
- Then, select the “Move” tool and hold down the “Shift” key while dragging the layer to resize it proportionately;
- You can continue duplicating layers and adjusting their positions to fill the canvas creatively while preserving the original image.
Smart Objects: Transform your image into a Smart Object by right-clicking on the layer and selecting “Convert to Smart Object.” This allows you to resize your image non-destructively and apply various filters and adjustments without losing quality.
Content-Aware Fill: If you have empty spaces to fill within your canvas, Photoshop’s Content-Aware Fill is an excellent tool. Simply select the empty area, go to “Edit” > “Fill,” and choose “Content-Aware.” Photoshop will analyze the surroundings and intelligently generate content to fill the space seamlessly.
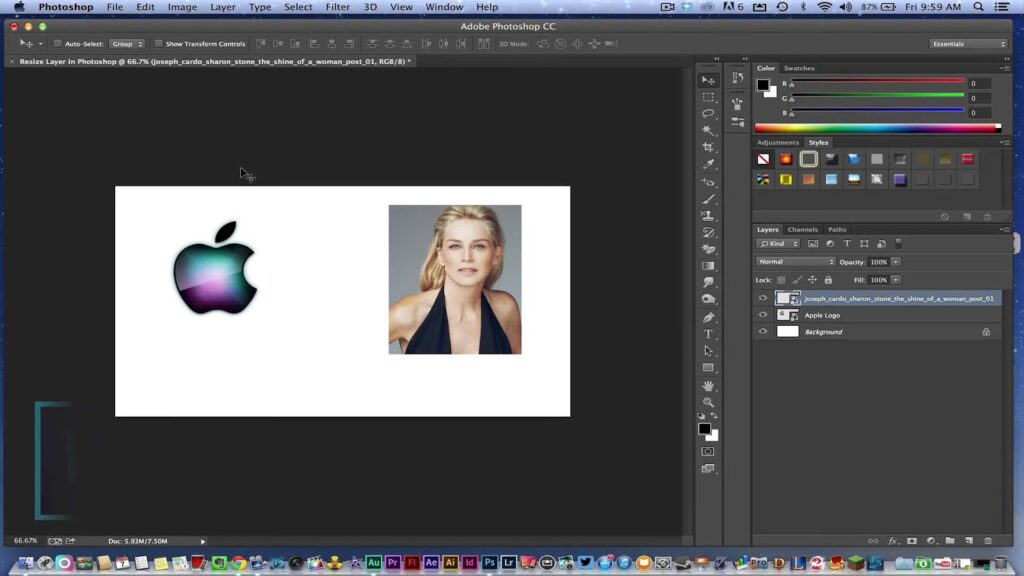
Resizing an Image Layer in Photoshop with Precision
When working on your creative projects in Photoshop, there are times when you need to resize specific elements within your composition without altering the entire canvas size. This technique becomes especially handy when you want to maintain the overall composition while making adjustments to individual layers. In this guide, we will explore how to expertly resize an image layer in Photoshop by dragging it, preserving the canvas size intact.
Why Use This Method?
Using the drag-to-resize method in Photoshop is a versatile approach for graphic designers, photographers, and digital artists who want to make precise adjustments to specific elements within their compositions. This technique allows you to scale an image layer without affecting other elements or layers, providing greater control over your creative process.
Step-by-Step Guide to Resize an Image Layer:
Step 1: Select and Unlock the Image Layer
Before you can start resizing your image layer, it’s essential to ensure that the selected layer is not locked or set as the background layer. Follow these steps to unlock it:
- Option 1: Convert the Background Layer to a Usable Layer
- In the Layers Panel, locate the background layer;
- Double-click on the background layer;
- A “New Layer” dialog box will appear, allowing you to change the layer’s name;
- Enter your desired layer name and click the “OK” button, or press Enter/Return on your keyboard;
- Your background layer is now converted into a usable layer that can be resized.
- Option 2: Unlock a Layer from the Layers Panel
- In the Layers Panel, find the layer you want to resize;
- Look for the lock icon on the right side of the layer’s thumbnail;
- Click on the lock icon;
- Once the lock icon disappears, the image layer is ready to be resized.
Now that your image layer is unlocked and ready for resizing, you can proceed to the next steps.
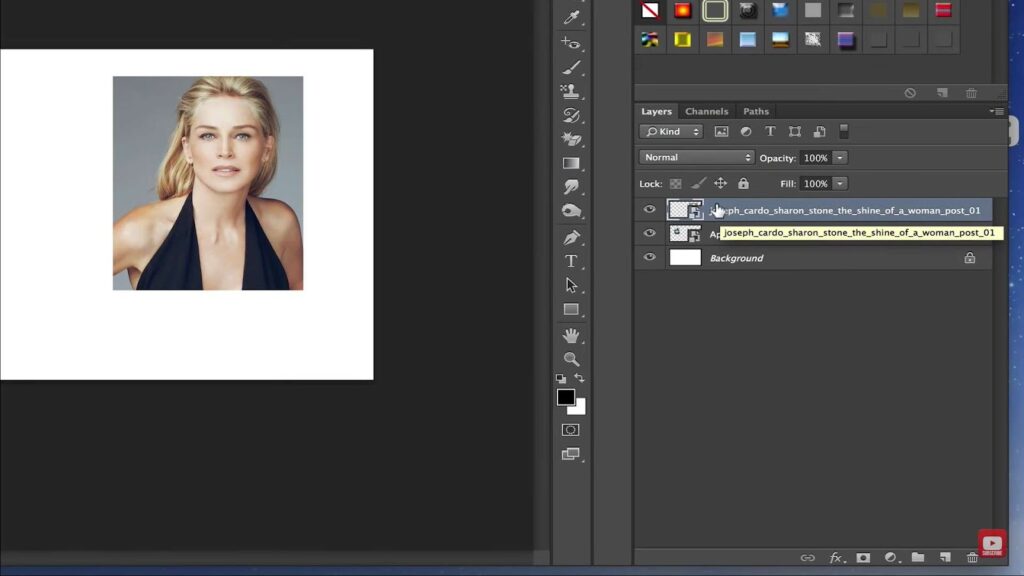
Step 2: Transforming Image Size with Finesse
Welcome to the next step in the captivating world of image manipulation! We’ve covered the basics, and now it’s time to delve deeper into the art of resizing images in Photoshop. Changing the size of your images is a fundamental skill for graphic designers, photographers, and digital artists alike. So, let’s sharpen those creative tools and discover how to finesse your image size.
- Selecting the Move Tool: The journey begins with the selection of the Move Tool, located conveniently in the Toolbar. This tool, often symbolized as a cross-shaped arrow, empowers you to move and resize your layers effortlessly;
- Layer Selection: Once you’ve armed yourself with the Move Tool, it’s time to wield its power. Click on the desired layer, and you’ll witness the magic unfolding. A bounding box will gracefully envelop your selected layer, providing visual cues for the upcoming transformation;
- Unveiling Transform Controls: If the bounding box remains elusive, fear not! There’s a hidden gem waiting for you just below the top menu bar – the “Show Transform Controls” option. A simple check mark activates this feature, making the bounding box visible and ready for your creative touch;
- Masterful Resizing: Now comes the exhilarating part! With your layer ensconced in the bounding box, you can resize it with precision. Drag any corner handle or side handle of the bounding box to your heart’s content, reshaping your image as you see fit. Remember, you’re the artist, and the canvas is your playground;
- Proportional Scaling: In the latest version of Photoshop, simplicity reigns supreme. No longer do you need to clasp the shift key while resizing. The software intuitively maintains proportionality, freeing you from unnecessary key presses. Less hassle, more creativity!
Step 3: Cementing Your Size Changes
With the canvas reflecting your artistic vision, it’s time to solidify your image’s new dimensions. You wouldn’t want your creation to revert unexpectedly, would you? Here’s how you seal the deal:
- Double-Click Confidence: One way to affirm your size transformation is by double-clicking on the image within the canvas. This gesture tells Photoshop that you’re committed to this change, ensuring your artistry remains intact;
- Keyboard Prowess: If you’re more of a keyboard aficionado, press the enter or return key. A simple act, yet it carries the weight of your creative intent, making your resizing endeavor official;
- Check Mark Mastery: Lastly, take a moment to admire your masterpiece and then locate the check mark (tick) button. It proudly sits on the options bar, waiting for your acknowledgment. By clicking it, you’re signaling to Photoshop that you’ve put your artistic stamp on this transformation.
Conclusion
In conclusion, Adobe Photoshop is a versatile tool that offers a multitude of options for resizing images. As we’ve explored, the approach you choose depends on your particular goals and preferences. Whether you opt for one of the four quick methods we discussed or decide to experiment with others, Photoshop’s magic wand-like capabilities ensure that you have the flexibility to achieve the best results for your unique needs. So, don’t hesitate to explore, experiment, and master the art of image resizing in Photoshop to unlock its full potential for your creative projects.