Ever pondered how drastically a new hair hue could transform your appearance? The thought might lead you to consider reaching for that bottle of hair dye stashed in a drawer. But what if there was a seamless, damage-free method to apprehend what you would look like sporting a new tinge?
This comprehensive guide fills you in on the intriguing process of online hair color transformation. This method allows you to digitally tinker with your mane, experimenting with the rainbow of fascinating shades at your disposal, without so much as touching a strand of your real hair.
A Comprehensive Guide to Color Transformation- Change Hair Color Online with PhotoMaster
Often when photo retouching comes to mind, the first image that pops up is of Adobe Photoshop. Undeniably, Photoshop is a force to reckon with in the universe of photo editing but can be quite a strain on your pocket. For amateurs, hobbyists, students, or those who simply wish to try out a new look virtually, investing in a pricey Photoshop software might not be the best option.
Luckily, there exists a terrific alternative- an online photo editing platform, PhotoMaster. Not only is this tool free of cost, but it also doesn’t require any installation. It’s beginner-friendly, delivering a Photoshop-like experience with its varied tools to spruce up your pictures.
In this tutorial, we’ll specifically explore using PhotoMaster to modify hair color in your images, transitioning to shades like black, white, and blonde. Moreover, we’ll also venture into adding streaks to the hair for an extra dash of charismatic appeal.
Setting up the Image
The first step in this fascinating photo editing endeavor is to choose the right image. Here are few factors that are crucial to keep in mind for a smoother transformation process:
- Hair Texture: Opt for a photo where the hair doesn’t appear too unruly. Rough hair can complicate the selection process, making it harder to determine the hair’s edges. This can result in a less-than-perfect final output;
- Contrasting Background: Ensure that the hair color of the subject contrasts sharply with the background. A background that blends with the hair color can make the selection process cumbersome;
- Lighting: A well-lit photo delivers better results. It not only makes the hair selection easier but also contributes to a more realistic final hair color, minimizing shadows and highlights.
Once you’ve selected the perfect image, it’s time to open it up in PhotoMaster.
- Head over to the PhotoMaster Editor;
- Click on ‘Open from Computer’;
- Choose your ready-to-transform image.
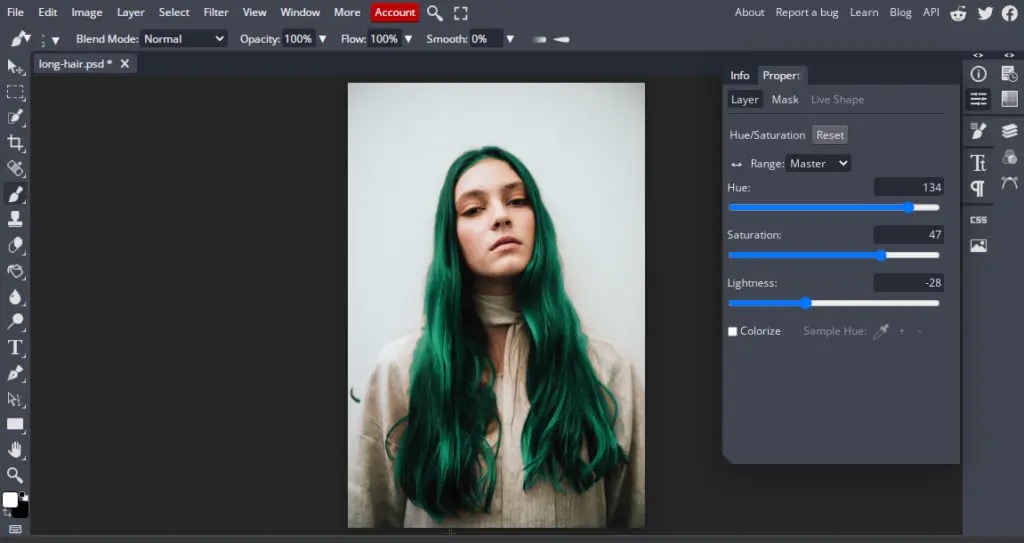
Implementing Hue/Saturation Adjustment Layer
Adjustment layers in PhotoMaster, like the Hue/Saturation layer, are fantastic resources to upgrade your photos. Here’s how to set one up:
- Access the Layers Panel on the right toolbar (represented by a stacked layers icon);
- Choose the adjustment layers from the bottom options (depicted by a half-white half-black circle);
- From the dropdown, select ‘Hue/Saturation’. This action adds a Hue/Saturation adjustment layer and triggers a new properties window.
Now, with the adjustment layer in place, you can apply any color you desire.
- Click on ‘Colorize’ in the properties- the color is now applied to your image;
- Adjust the sliders to your preference.
Once you’re satisfied with the color, close the properties panel via the sliders icon on the right. Even though at this point, the entire subject appears colored, the next steps will restrict the color to the hair only.
Hiding the Color and Revealing it on the Hair with the Paint Brush Tool
After adding the Hue/Saturation adjustment layer and choosing a color, here’s how to limit the color to the hair:
- Select the Mask on the right side of the Hue/Saturation Layer in the Layers Panel;
- From the right toolbar, click and hold the gradient tool to pick the Paint Bucket tool;
- With the Paint Bucket tool active, switch your foreground color from white to black;
- The default background color is black, so moving it to the foreground would cover our hue/saturation layer. Applying it to the mask makes the color effect disappear, but the layer persists.
With the color hidden, it’s time to reveal it by overlaying it on the hair.
- Choose the Paint Brush tool from the left toolbar or press ‘B’ on your keyboard;
- Switch the foreground color back to white and select the Hue/Saturation Layer Mask;
- Start painting on the hair to reveal the color. Use the toolbar on top to modify the brush size, opacity, and flow. Alternatively, use hotkeys to adjust the brush size (left and right brackets on your keyboard) and edge quality (Hold Shift and press Left bracket key for softer edges or Right bracket key for harder edges);
- In case of intricate areas like flyaways or loose strands, lower the brush opacity to around 25 and paint over them. This technique ensures a realistic finish without compromising on quality.
Saving Your Image
Once you’ve successfully colored the hair, the final step is saving your masterpiece. PhotoMaster offers a variety of export options to cater to your requirements.
- To save your image, go to ‘File’ > ‘Export As’ > select the format you prefer- PNG or JPG.
Experimenting with Colors: A Step-by-Step to Digitally Repaint Your Locks
It’s natural to want a refreshing change occasionally, and what better way than to alter the shade of your tresses? However, the idea may bring along some apprehension. What if the color doesn’t suit you, or what if you regret the change? Enter digital hair color transformation- a game-changer allowing you to envision your look with different hair colors.
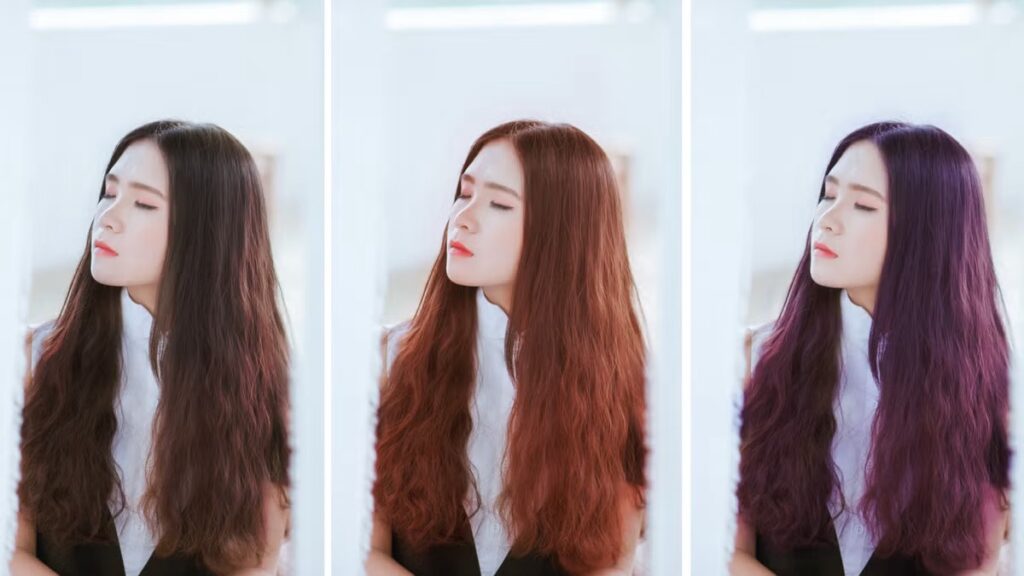
Revising Your Hair Color Digitally
Considering you have already established a Hue/Saturation adjustment layer following the previous steps, switching to a new color is incredibly seamless. Here’s how to do it:
- Go to the Layers Panel on your right and double-click on the Hue/Saturation Adjustment Layer. This action re-opens the properties panel;
- Within the properties panel, you’ll find sliding bars for hue, saturation, and lightness. By manipulating these sliders, you can try out a vast spectrum of colors.
The hue slider takes care of the color, shifting it across the range. Moving the hue slider results in an exciting transition, and as the slider’s values change, your hair color cycles through the rainbow of possibilities.
The saturation slider controls the color intensity. Slide it to the right for a vibrant, saturated color and to the left for a more muted, faded effect.
The lightness slider, as the name suggests, determines how light or dark the color appears. Sliding it to the right lightens the color, while moving it to the left darkens it.
Feel free to tweak these sliders as much as you want until you find your ideal shade. It’s all about experimenting and discovering what works best for your complexion, facial features, personality, and overall style.
Infuse a Splash of Color: Add Vibrant Streaks to Your Hair Digitally
Sometimes, a full hair color change can feel too drastic or adventurous. That’s where hair streaks step in, offering a perfect balance between monotony and flamboyance. Streaks allow you to experiment with different shades subtly, enhancing your hair’s charm without overwhelming your overall look.
Adding another Hue/Saturation adjustment layer
The process begins with adding an additional Hue/Saturation adjustment layer on top of your existing one. This new layer will house your streak color.
- Open the Layers Panel and add another Hue/Saturation Layer. Ensure this layer sits atop the previous one;
- This new layer forms the base for your streak color, lying over your primary color.
Adjusting the Hue/Saturation sliders for the streak color
The next step is adjusting the properties of your new Hue/Saturation layer to get the desired shade for your streaks. In this case, we’re aiming for a bright green.
- From the properties panel that pops up when you create the new layer, tweak the sliders to get the color you envision for your streaks;
- After adjusting the sliders, your photo will get covered entirely by the new color. But don’t fret, this is part of the process.
Painting the Layer Mask Black
The next step is to make the new layer’s color disappear temporarily by painting the layer mask black.
- Switch your foreground color to black;
- Select the Paint Bucket tool again and apply it to your new layer’s mask;
- Now, your layer’s color effects are hidden but still exist.
Painting the Streaks
With the preparations complete, it’s finally time to add those gorgeous streaks.
- Switch your foreground color back to white;
- Select the Paint Brush tool by either clicking on it from the dashboard or simply pressing ‘B’ on your keyboard;
- Start painting on the areas of your hair where you want to add the green streaks. As you paint white onto the layer mask, the green color begins to reveal itself, beautifully blending into your base hair color. Remember to adjust the brush size, opacity, and flow as needed to achieve a more realistic look.
Portable Photoshop Online: Enhancing Your Creativity
In your quest for digital image enhancement, you may have come across the idea of “Portable Photoshop Online.” This concept seamlessly intertwines with the topic of this article, offering you a versatile tool for augmenting your creativity and manipulating visual content.
While Adobe Photoshop stands as a pinnacle in the realm of photo editing, its installation can be cumbersome and expensive. For those seeking a more accessible and cost-effective alternative, the notion of “Portable Photoshop Online” is nothing short of a revelation. This approach allows you to harness the power of advanced image editing without the need for intricate installations or substantial financial investments.
Whether you are an amateur, a student, or an enthusiast exploring new horizons in visual creativity, “Portable Photoshop Online” provides an avenue to experiment with a diverse range of image enhancement techniques. From adjusting colors to applying artistic filters, this online solution offers a plethora of tools at your disposal.
Moreover, the integration of “Portable Photoshop Online” into your exploration of digital hair color transformation with PhotoMaster expands your creative repertoire. You can seamlessly transition between these platforms, combining the strengths of both to achieve captivating and distinctive results.
Conclusion
By employing BunnyPic’s online platform, you can effortlessly experiment with hair color transformations, even adding streaks for a glamorized effect. Understanding the nuances of photo editing and color manipulation can be a captivating hobby and an impressive skill. This tutorial equipped you with the knowledge to dabble with different hair colors and streaks, letting you envisage a spectrum of looks. Remember, in the realm of digital manipulation, creativity knows no bounds- so, continue experimenting, keep learning, and embrace the colorful possibilities.